Historical sewing blogger "The Dreamstress" has organised a rather wonderful project for 2013 - the historical sew fortnightly. The idea is that every fortnight, there is a themed challenge to complete by the end of that fortnight. You can do as many or as few as you want, and the challenges are posted 7 challenges (so 14 weeks) in advance, and you can start as early as you want as long as its done in time. The themes posted so far have been really good - easy for anyone to come up with something that fits the theme regardless of period of interest etc.
The first challenge was to make something from the year XX13 - I missed that one, but it is the inspiration for my next few challenges - more on that later.
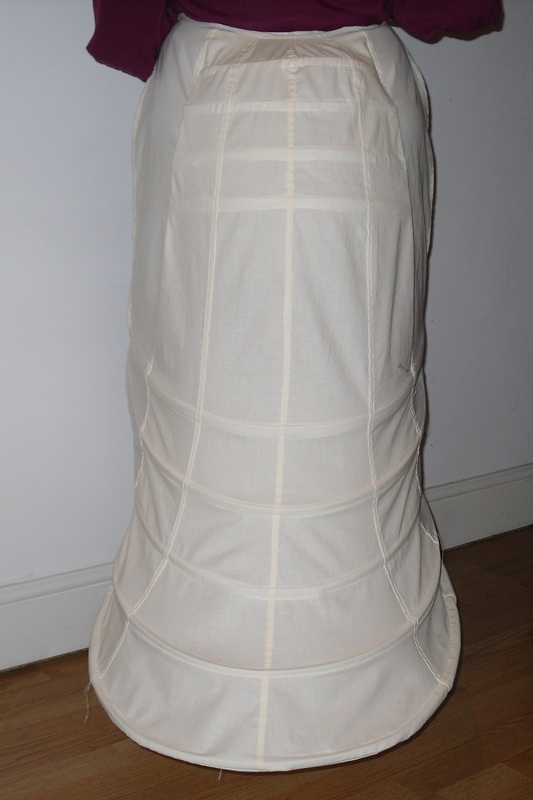
Challenge number 2 was to complete a UFO. While I have many USO's (new term I just invented: Un-Started Objects) I, once I've committed to a project 'm actually pretty good at sticking to a project until I finish it. So I only had one UFO to choose from. I cut out the pieces for the laughing moon train supporting bustle probably a year and a half ago (I think it was when I was handsewing lace on my wedding dress and decided I needed to do something quick and from pattern to regain my sanity). I got as far as marking the lines for the boning, making the lacing panels and sewing the center back pieces together, and that was it.
This project was pretty easy to complete, I decided I didn't like the idea of unfinished seams on the inside and as there were no instructions on finishing, I did flat felled seams. I cut my own bias binding to hold the steel in place, and the trickiest bit was getting the boning through the chanels. I need to research good ways of finishing ends of boning - I left them unfinished which means they sometimes catch, but finishing them would add bulk and its a prtty tight fit.
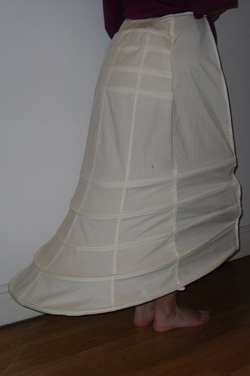
I'm not entirely happy with the end result. While the silhouette is good in theory, in practice the bustle swings forward, so the back is lower than the front. I wondered at first if I did something wrong, but after googling for pictures of how other's had done it, I noticed that they had the same problem (see here for a thread on carolinabelles). I tried a petticoat over the bustle to see if this helped, but it actually pushed it further forwards and the front edge of the bustle could be seen through the petti.
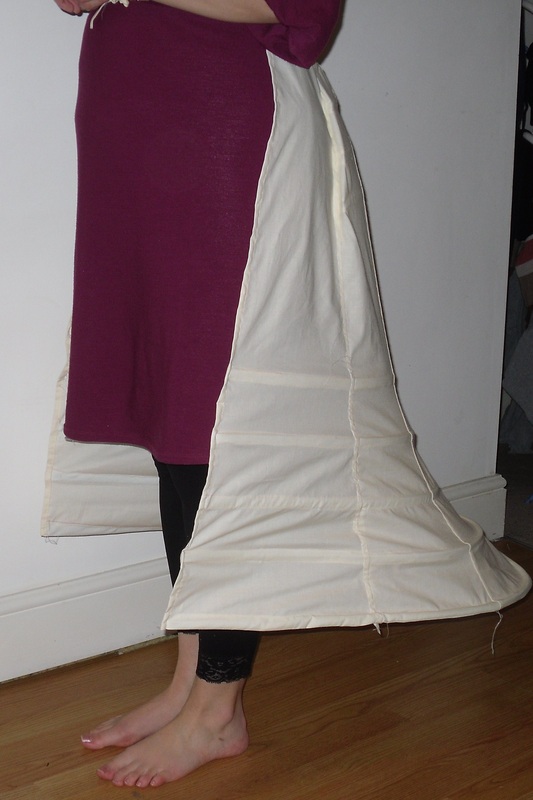
I can think of two ways of fixing this. The first is to add weights to the front edge, to counter balance the extra steel at the back. I tried this (with safety pins and cutelry!) and it definately improved matters, the problem is that all this balancign would be have to be redone for each petticoat and dress - things could get very heavy! The other thing I considered doing was moving the lower panel forward - at the moment it doesn't touch my legs at all. I found the following on the farthingales corset blog which sounds like they did this with good results.
"I also found that I needed to move the lower panel that is at calf level. The pattern instructions indicated that this panel be attached further to the inner curve of the bustle but I found it bounced off my calves too much when I walked
- this may not have happened if I had a skirt over it to add weight. I moved the panel to the front edge of the bustle and preferred the balance this gave."
I think that's what i'll try, but for know I'm declaring this unfinished object done - I'll revisit it when I havea dress to go over it!
The Challenge: #2 UFO
Fabric: Unbleached Poly cotton curtain lining from fabricland
Pattern: Laughing Moon #112 Hoops and Bustles, view C
Year: (According to the pattern envelope) 1869-1876 and 1883-1889
Notions: 36 grommets, ribbon for lacing, rigelene and hoop steel
How historically accurate is it? Not very - the materials are whatever I happened to have, the assembly is all done by machine and I'm not even sure if the pattern is accurate - most bustles I see online are wire and tape, but that may be due to the tension placed on the fabric meaning very few fabric bustles survive.
Hours to complete: Forgot I was going to be asked this question so I didn't keep track!
First worn: Not yet - it needs a dress to go over it!
Total cost: Around £20 for steel, £3 worth of grommets and £3 for fabric, so £26 - but it all came from stash!
The first challenge was to make something from the year XX13 - I missed that one, but it is the inspiration for my next few challenges - more on that later.
Challenge number 2 was to complete a UFO. While I have many USO's (new term I just invented: Un-Started Objects) I, once I've committed to a project 'm actually pretty good at sticking to a project until I finish it. So I only had one UFO to choose from. I cut out the pieces for the laughing moon train supporting bustle probably a year and a half ago (I think it was when I was handsewing lace on my wedding dress and decided I needed to do something quick and from pattern to regain my sanity). I got as far as marking the lines for the boning, making the lacing panels and sewing the center back pieces together, and that was it.
This project was pretty easy to complete, I decided I didn't like the idea of unfinished seams on the inside and as there were no instructions on finishing, I did flat felled seams. I cut my own bias binding to hold the steel in place, and the trickiest bit was getting the boning through the chanels. I need to research good ways of finishing ends of boning - I left them unfinished which means they sometimes catch, but finishing them would add bulk and its a prtty tight fit.
I'm not entirely happy with the end result. While the silhouette is good in theory, in practice the bustle swings forward, so the back is lower than the front. I wondered at first if I did something wrong, but after googling for pictures of how other's had done it, I noticed that they had the same problem (see here for a thread on carolinabelles). I tried a petticoat over the bustle to see if this helped, but it actually pushed it further forwards and the front edge of the bustle could be seen through the petti.
I can think of two ways of fixing this. The first is to add weights to the front edge, to counter balance the extra steel at the back. I tried this (with safety pins and cutelry!) and it definately improved matters, the problem is that all this balancign would be have to be redone for each petticoat and dress - things could get very heavy! The other thing I considered doing was moving the lower panel forward - at the moment it doesn't touch my legs at all. I found the following on the farthingales corset blog which sounds like they did this with good results.
"I also found that I needed to move the lower panel that is at calf level. The pattern instructions indicated that this panel be attached further to the inner curve of the bustle but I found it bounced off my calves too much when I walked
- this may not have happened if I had a skirt over it to add weight. I moved the panel to the front edge of the bustle and preferred the balance this gave."
I think that's what i'll try, but for know I'm declaring this unfinished object done - I'll revisit it when I havea dress to go over it!
The Challenge: #2 UFO
Fabric: Unbleached Poly cotton curtain lining from fabricland
Pattern: Laughing Moon #112 Hoops and Bustles, view C
Year: (According to the pattern envelope) 1869-1876 and 1883-1889
Notions: 36 grommets, ribbon for lacing, rigelene and hoop steel
How historically accurate is it? Not very - the materials are whatever I happened to have, the assembly is all done by machine and I'm not even sure if the pattern is accurate - most bustles I see online are wire and tape, but that may be due to the tension placed on the fabric meaning very few fabric bustles survive.
Hours to complete: Forgot I was going to be asked this question so I didn't keep track!
First worn: Not yet - it needs a dress to go over it!
Total cost: Around £20 for steel, £3 worth of grommets and £3 for fabric, so £26 - but it all came from stash!

 RSS Feed