FarAboveRubies
  • Blogs
    • Blog
    • My Wedding Dress
  • Gallery
    • Formal Wear Gallery
    • Historical Costume Gallery
    • Theatre Gallery
  • Shop

1830s Ballgown part 2

12/5/2010

0 Comments

 
And last post for today, I've made some progress on my 1830's ballgown.
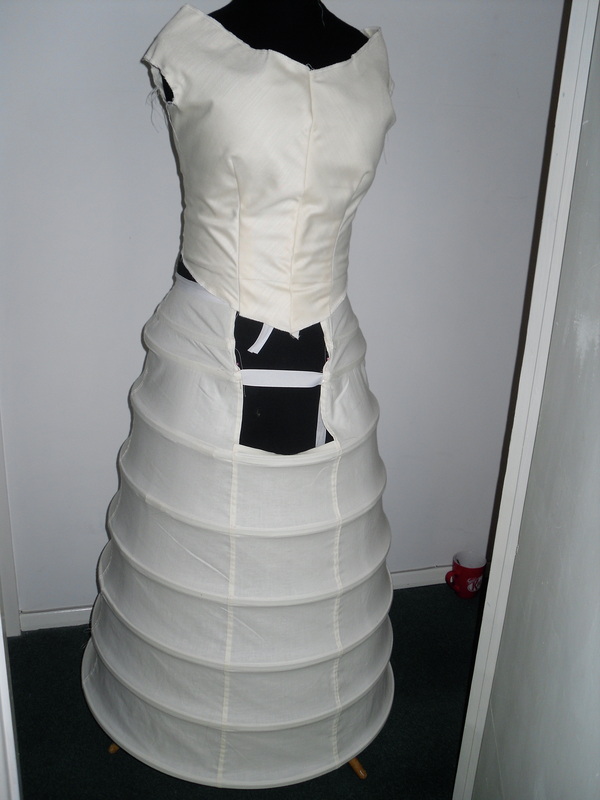
1. An appropriately shaped hoop skirt, using the Laughing Moon hoop skirt pattern. Went together nice and easy, but definatly needs a petticoat over the top to stop the wires showing through the skirt.
2. Started playing with the bodice overlay - I don't like it so far but I'm not really sure whats wrong, so I think I'll take it all off and do something else and see if my subconscious can sort it out.
Next steps:
1. Make a petticoat floor the new hoop (remembering to check on the appropriate length for 1830's)
2. Cut out sleeve pieces and make up, since I think they'll affect the balance of the dress a lot.
3. Start making up the overskirt, planning to level from the top so that things can be hemmed (or possibly use the selvedge of the fabric) before assembly.
And that's the end of this very numerical post!
0 Comments

Johns Frock coat

12/5/2010

0 Comments

 
Picture
I love it! He finally got to try it on and fortunately it fits! We didn't get to attend the Dickens event at Rochester so its modeled here with jeans and a shirt that doesn't fit. I'm unsure of whether I need to add even more to the torso length in future, or if the pro But the important thing is the jacket does fit :)

I also made a puff tie from the same fabric as the waistcoat. Surprisingly there don't seem to be instructions on line to make this so I figured it out from instructions on how to tie one and thought I'd post my 'how to' here.

Start with a two rectangles of fabric - one 9" by 28" and one 2 1/4" by 10".

Fold the larger strip in half lengthwise, right sides together and sew a 1/2" seam around the raw edges, leaving a small gap at the center of the long edge.

Turn right side out. I chose not to press at this stage to give more 'puff' to my tie, you may find your fabric needs it.

Sew a narrow hem around 3 sides of the smaller rectangle. Wrap the small rectangle around the center of the larger rectangle and stitch, leaving a long tail on one side.

Attach to a piece of tape long enough to go round your neck and fasten - I used bow tie fastenings, but you could use velcro or tie a knot at the back.

To wear the tie, tie round your neck with the tail section pointing down. Tuck each side piece under the opposite side of the waistcoat, so that they have a gentle fold at the top and cross over at the bottom. Tuck in securely but not so tight that the puff tie ends up flat. If you wish you can add a tie pin. The 'tail' section should fill any gap between the two side pieces.

Hope thats helpful!

Picture
0 Comments

Thistle Embroidery Sample

12/5/2010

0 Comments

 
Picture
So I completed my sample piece for the thistle embroidery. I used the duchess satin and the narrowest of my two sample cords.
I drew the design onto a piece of curtain lining and sandwiched the lining and the satin together in the embroidery hoop. Flipping the hoop backwards and forwards I could follow the design drawn on the backing.
I tried two different stitches. My first choice, couching, didn't work too well (see RHS of picture). This involves stitching over the cord at regular intervals. Because the cord is an inner cord covered fairly loosely with a satin weave tube, I ended up with a sausage effect, little dents very time I stitched over. This wasn't what I wanted at all!
I then tried stitching through the cord, and was much happier with the results. I need to do a little more experimentation to see if I can find a way pf producing neat, sharp corners. Sharp turns are  key feature of this design, and at the moment the cord spreads on the internal angle - probably one of those noone but the seamstress would notice, but the whole point of this project si to make itas perfect as possible :)
Finally, just to make you all jealous here are a couple of picks of where i was when I sewed this.

0 Comments

    Author

    My crazy costuming, sewing and maybe other stuff too blog! Hopefully others can learn from my mistakes and I can learn from your comments :)

    Hey you! ;)

    According to the stats people are actually visiting this site - I'd love to know who you are so please leave comments!

    Archives

    June 2017
    April 2017
    February 2017
    August 2016
    February 2016
    January 2016
    June 2015
    October 2014
    September 2014
    October 2013
    May 2013
    April 2013
    March 2013
    February 2013
    January 2013
    November 2012
    October 2012
    September 2012
    August 2012
    July 2012
    June 2012
    April 2012
    March 2012
    January 2012
    October 2011
    August 2011
    February 2011
    January 2011
    December 2010
    November 2010
    October 2010

    Categories

    All
    1830s
    1860s
    1870s
    1880s
    Bridal
    Coat
    Custom Order
    Florence Maud Dowding
    Historical Accuracy
    Historical Sew Fortnightly
    Holy Grail 2011
    Inspiration
    Kids Clothes
    Modern Clothing
    Pattern Drafting
    Project Destash
    Random Stuff
    Underwear
    Victorian Menswear

    RSS Feed

    Picture
Powered by Create your own unique website with customizable templates.