This has been a long time coming but was finally triggered by the awful nightdress in the previous post- all the fitting problems were in the back and seeing what's going on with your own back is tricky enough, actually pinning in alterations is impossible.
So, in order to fix it i needed a dress form that at looks like me. I padded mine out years ago but my shape has changed dramatically since then, so it was time to do it again. I followed instructions from various blogs so I'm not gonna do a full tutorial, just a quick description and my favourite tips.
Step 1 Make up a simple princess seam dress pattern in non stretch scrap fabric. Add a zip at centre back.
Step 2 Put the dress on and fit the heck out of it. Seriously, we're aiming for skin tight here, and if it's too tight to move that's fine. It's worth trying to get your seams straight too, as you may want to use them to line up future projects.
Step 3 make up your super fitted version in sturdy (upholstery weight) 100% cotton fabric
Step 4 place the cover on the form. Start padding the form in layer, working on the bottom by flipping the cover and the top by opening the zip. In most cases you'll want to start with the dummy smaller than your measurements, as this gives you the chance to adjust vertically, and to add any lumps and bumps. Use pins to attatch the padding but make sure they're not gonna get you later.
Top tip: after adding a layer of padding, try wrapping in cling film. This squashes everything down and gives a lovely firm base for the next layer.
Top tip: use a well fitting bra or purchased bra cups to help get the right shape for your boobs
Top tip: when your all done, spray lightly with water till damp not dripping. The heavy cotton will shrink slightly and give you a lovely snug fitting cover.
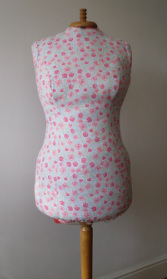
What not to do: as you may have noticed, I forgot to take into account how much length would be taken up by the width, and ended up with a cover that's a little too short.
An interesting thing to note is that my dummy has lost almost all its neck - I've always found the distance from shoulder to bust to be much too short, so I'm actually pretty happy about this. I do need to figure out how to finish the raw bit around the neck though.
So, in order to fix it i needed a dress form that at looks like me. I padded mine out years ago but my shape has changed dramatically since then, so it was time to do it again. I followed instructions from various blogs so I'm not gonna do a full tutorial, just a quick description and my favourite tips.
Step 1 Make up a simple princess seam dress pattern in non stretch scrap fabric. Add a zip at centre back.
Step 2 Put the dress on and fit the heck out of it. Seriously, we're aiming for skin tight here, and if it's too tight to move that's fine. It's worth trying to get your seams straight too, as you may want to use them to line up future projects.
Step 3 make up your super fitted version in sturdy (upholstery weight) 100% cotton fabric
Step 4 place the cover on the form. Start padding the form in layer, working on the bottom by flipping the cover and the top by opening the zip. In most cases you'll want to start with the dummy smaller than your measurements, as this gives you the chance to adjust vertically, and to add any lumps and bumps. Use pins to attatch the padding but make sure they're not gonna get you later.
Top tip: after adding a layer of padding, try wrapping in cling film. This squashes everything down and gives a lovely firm base for the next layer.
Top tip: use a well fitting bra or purchased bra cups to help get the right shape for your boobs
Top tip: when your all done, spray lightly with water till damp not dripping. The heavy cotton will shrink slightly and give you a lovely snug fitting cover.
What not to do: as you may have noticed, I forgot to take into account how much length would be taken up by the width, and ended up with a cover that's a little too short.
An interesting thing to note is that my dummy has lost almost all its neck - I've always found the distance from shoulder to bust to be much too short, so I'm actually pretty happy about this. I do need to figure out how to finish the raw bit around the neck though.
 RSS Feed